Showing posts with label Tutorials. Show all posts

Tuesday, 19 November 2013

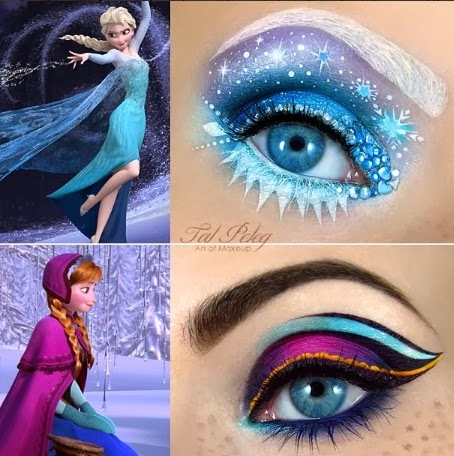
Inspiring Eye art by Tal Peleg


I am always discovering new talent on Instagram and at the moment I am loving all the detailed eye art artists are creating all over Instagram. They are saying now that 2014 could well be the year of Eye Art! So move over nail art…


Israeli Make-Up Artist Tal Peleg, who has created amazing incredible creations makes you want to pick up your detailed Crown-brushes to see if you can create something similar, I certainly do! 


Tal has created eye art designs from movies, food and even animals! I catch myself staring at her art or minutes. I can’t actually believe it’s done with make-up!


Tal shares that it's not hard to draw on her own eye and that it's  easier than drawing on someone else's eyelid. Tal also expresses
 it is possible to be so precise with the right equipment, experience, tools and steady hand. People are writing names on rice grains!
~
Inspired by Tal's creation and don't have the tools? Then check out our full range of eyeliner brushes on www.crownbrush.co.uk


Check out the rest of Tal's amazing design on her Facebook and Instagram.

~
Karla
X


Tuesday, 13 August 2013

1 EYELINER and 3 LOOKS with 3 Crownbrushes!


Talk about a multitasking makeup look- One eyeliner can provide up to five or more very different looks for your eyes. 
 Lining your eyes places emphasis on one of your most beautiful features and can provide a touch of needed polish on a day when you are truly short on time. Eyeliner also serves as important part of an evening makeup look, and you can spice things up by layering on sultry shades to achieve the smoky eye that you see on the red carpet and in magazines. 

By providing infinite eye looks, eyeliner is a must have for your makeup kit!


GET IN LINE

Eyeliner comes in several forms, including liquid with a brush or in a felt tip pen type applicator. Eyeliner pencils, sometimes known as kohl eyeliners, are just that. Pencils that can be self-sharpening or have a sponge tip for smudging on the opposite end of the pencil. Some powder eye shadows can function as liner when used with a wet eyeliner brush.


Personally, I find using make-up brushes easy to use , and they are also generally the best for contact lens wearers, as liquid liner can sometime flake and fall into your eyes and you have fully control how much product you apply on your brush to create your desired eyeliner design.


Here are three Crownbrushes I love to use when creating three of the most popular eyeliner looks:


Flat Line Definer
C432

Designed with flawless liner application. The firm synthetic bristles are cut and placed in a perfect straight line. Capable of applying an ultra thin, or slightly smudged smoky line along the lash line. This brush works well with both cream and powder liners or for smudging pencils into the lash line.

Taklon Angle Liner

A multi-use brush! It’s designed for looks that are focused around the lashes, because the angle part helps you draw a precise line. So it’s not only perfect for applying gel eyeliner but also for the darkest shade of your smoky eye. I also love it for delivering a concentrated hit of bright colour. 

Bent Liner

An angled eyeliner brush has been designed  for use with cream or gel eyeliners due to it's Synthetic Bristles with a tapered, super-fine tip that fits perfectly along the lash line, making it easy to draw a clean, crisp line with extreme precision. 


What brushes do you use when applying eyeliner?

~
Karla

X

Monday, 5 August 2013

Face Painting Tutorial with Face Painter 'Kate Monroe Artistry'


Katy Groves known as 'Kate Monroe Artistry’ Is one of the most NEW ‘Creative Face Painters’ I have come across lately, again I discovered her on Instagram (my favourite place to find new talent). Kate’s work really inspires me to pick up my face painting brushes and to get back into face painting!  I love how she transforms herself into different characters.


 Kate is from the UK, Staffordshire who is a fully insured & qualified specialist face painting. Check out some of Kate’s designs here:


For our blog takeover I asked Kate to create an exclusive look for the Crownbrush blog this week to inspire you all and encourage you to experiment with face paints.  Hope you enjoy this tutorial as much as I did! Thank you Kate for inspiring us!

Butterfly Face Painting Tutorial: 


1. Start by creating a subtle base of eyeshadow in colours which will compliment the colour of the butterfly you are producing. Here I used nude shades mixed with a little gold and copper. You only want to keep the eyeshadow soft and subtle because the main focus of the design is on the butterfly wings. Then use your primary colour, (I used Superstar 'Ploppy Orange') to create the shape of your butterfly.


2. Using Superstar Copper, and Cameleon Bodypaint Plum Fairy, I blended them into the orange to create depth and add darker shades to the wings.

3. Using Superstar Pale yellow, I then added and blended a few flecks of highlights to the wing base.

4. Outline the wings. I used Cameleon Bodypaint Strong Black, however you could use liquid or gel eyeliner for this.

5. Now it's time to start adding the detail. I am creating a Monarch Butterfly in this design, so it is all about the line work and replicating a realistic wing pattern.

6. After drawing out a basic outline, I then filled in the relevant sections so they were bold and dramatic.

7. Using a dry brush, i then slightly blended in some of the edges of the line work. This is only a subtle detail, but it creates extra depth and therefore makes the design more realistic as opposed to being 'cartoony'.

8. Using the Pale Yellow again, I then add a few specks of yellow onto the bold black edges, as well as adding a few extra highlights within the wing pattern.

9. Using Cameleon Bodypaint Pure White, I then added more specks and dots to the black outline of the wings, as well as more highlights within the wings.


10. I finished by lining the eyes to make the overall look more dramatic.

Follow Jade:


Will you be giving this look a go? I am so inspired!


Karla

X

Tuesday, 30 July 2013

Be Inspired by Make-up Artist Jade Brady...


Manchester, UK based Make-up Artist Jade Brady who works in weddings, special occasions, photography, TV & film work and creates Asian bridal and special effects makeup caught my eye on our Instagram as well as Jade winning our #MakeupMonday recently. This seems to be my favourite place at the moment discovering different new artists!

What I loved about Jade’s work is that it’s different and unique. Jade is not scared about experimenting with texture colour and design when it comes to make-up. I asked Jade to take over our blog today and create an exclusive look to inspire you all to get creative with make-up.


Some of Jade’s Work:

Jade's Takeover Tutorial…


1. First I applied NYX jumbo pencil in milk all over the lid to act as a base for my eyeshadow.

2. Using the Crownbrush SS0111 Deluxe Oval Shadow brush 
I applied the dark purple from the Crownbrush Professional 88 (01) Palette just above the crease and blended, I also applied this colour on the outer V. 

3. I applied a bright pink from the Crownbrush Professional 88 (01) palette above the purple and blended into the eyebrow.

4. I applied a coral/orange colour from the same palette into the crease, and on the lower lash line.

5. I used a metallic gold eyeshadow and gold glitter on the lid, and decorated the outer area of the eye with random spots of glitter.


Follow Jade Brady:


A huge thanks to Jade for creating this fun look on this week's Crownbrush blog takeover.
~
Karla

X